As the organiser of a YEW event, one thing we ask of you is that you record it (if it’s an online event) so people can watch it again later on YouTube. We will be putting links to all the videos on our website once the week has finished, so people can find them easily. You can either host the video on your own YouTube channel and send us the link, or you can send us the video file and we will host it on the YEW channel. This guide explains how to go about doing this.
Recording your event
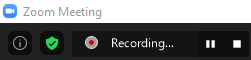
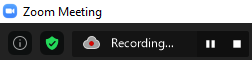
When your Zoom event starts, you will need to make sure it is recording. If you ticked the “Automatically record meeting” box when you scheduled the event (see previous guide), you should find that it starts recording as soon as you start the meeting – look for the little red circle near the top-left of the window. It will look like one of the two pictures below depending on whether you are recording to the cloud or your computer:
If you don’t see one of these then you will need to click the Record button at the bottom of the window:

As suggested above, when you click this, you will have two options: record to your computer (i.e. your hard drive) or to the cloud (store it on Zoom’s servers to access later through their website). It’s up to you which option you choose, but in case you need any help choosing:
Record to computer or cloud?
The first thing to note is that you can only record to the cloud if you have a paid Zoom account. All paid Zoom accounts have 1GB of storage, which is enough to record a meeting of roughly 2.5 hours’ length.
Advantages of recording to the cloud:
- Easy to share the recording with people (including YEW) afterwards
- Recording will be less severely impacted if you have an unstable internet connection
Disadvantages of recording to the cloud:
- Have to wait for a while after the meeting to access the recording
- If recording more than one event, might struggle with just 1GB of online storage
Sending us the recording
If you want us to host the video on our own YEW YouTube channel, you will need to send us the video file of the recording after the event has finished.
If you have recorded to the cloud, this is very simple:
- Wait for an email from Zoom to say your recording has finished processing and is ready to view
- Go to the Zoom website and click “Sign In”
- Fill in your username and password
- On the left-hand side, click “Recordings”
- Find the name of your event in the table and click the Share button on the right-hand side
- When the dialog box pops up, click the “Copy Sharing Information” button at the bottom. This will copy some text to the clipboard.
- Send an email to info@yorkenvironmentweek.org.uk, pasting the text into the email (right-click and then “Paste” or CTRL+V). In the email, also tell us which event the recording is for, and the start/end times for the final video (see below for more information on this).
If you have saved the recording to your computer then you will need to send us the file using an online service such as WeTransfer:
- Go to https://wetransfer.com/upload and accept the terms & conditions
- Click the Add button and choose your video file to upload from your hard drive
- Add a message to say which event the video is for, and the start/end times for the final video (see below for more information on this)
- Click Next
- When asked if you’d like to send an email or copy the link, choose email
- Put info@yorkenvironmentweek.org.uk as the To address, and your own email address as the From address
- Press the Transfer button
- You will be emailed a confirmation code; enter this code into the form and click Verify. Your file will then be sent to us.
Note: If your video is bigger than 2GB then you won’t be able to send it using WeTransfer. In this case, please contact us to discuss.
Important: video start/end times
When sending us your video to put on the YEW YouTube channel, it is very important that you tell us the start and end times you want us to use in your video. For example, if the first twenty minutes of your video are just people getting ready before the event start, you should tell us that the video start time is at 20 minutes. If you could give us the time to the exact second, that would be even better e.g. 20:13 would be 20 minutes and 13 seconds. Similarly, if the final five minutes of the video is just a slow trickle of people leaving the meeting, you should tell us to trim the video 5 minutes before the end. Again, an exact timestamp would be even better e.g. If your video is an hour long, 5 minutes before the end would be 55:00. If your video is 1 hour 30 minutes, the timestamp would be 1:25:00.
It is very important you tell us this so that we can trim the video correctly to cut out the irrelevant bits at the start and end. We will trim the video at whatever times you give us, so it’s your responsibility to make sure the times are correct. If you don’t give us any times then we will assume you want the whole video included from start to finish.
If you recorded your event to the cloud, you can preview your video by clicking on it in the Recordings section of the Zoom website (see above). This will allow you to work out the start/end times.
You are more than welcome to edit the video yourself and trim it, add effects, captions etc. Just send us the edited video, letting us know you have done this, and we will upload it as-is.
Uploading a video to your own channel
If you want to host the video on your own YouTube channel rather than ours, please send us the link to it so we can still include it on our website. This will help signpost more viewers to the video and allow us to have a complete archive of all the recordings.
And finally: don’t forget to press Record!
There are a lot of things to think about on the day of the event, and it can be easy to forget to make sure the video is actually recording, so just remember to double-check at the start! If you have a team of co-presenters (see previous guide), you could make it one person’s job to ensure that the video is recording, or even ask multiple people to record the event to their computers. This will reduce the chance of any unfortunate slip-ups leading to the recording being lost.